We have all seen and heard of Photoshop, and we have used it at some point in time, to resize images, to create artwork and banners. In comparison, most of us have not used 3D modeling software as much. Creating 3d models and scenes have several applications too. They can be used for creating art, games, virtual environments and showcases, even used as CAD applications to create virtual structures or printable 3d models. Your imagination is the only limiting factor, to what you can do with 3d modeling.
 A large hurdle, however, has been the cost of most 3D modeling software. Popular commercial packages have cost a lot of money for a year’s license, sometimes running into lakhs. An alternative has existed for a very long time, and it’s called Blender. Unlike its proprietary counterparts, Blender is entirely free and open-source. You can download it from blender.org for several platforms. Blender isn’t just a 3d Modeling software like most popular commercial options. It includes everything from a modeler, to a painter, even video editing tools. If you’re not looking to do 3d modeling, you will still find it useful for other creative tasks. The entire download from blender.org weighs a little over 130 megabytes, roughly the same size as a music album or a 5-minute YouTube video.
This article gives you a gist of what to expect if you were to pick up Blender. It can appear intimidating, but once you spend more time on it, you will realize that all those menus, dropdowns and tabs are there for a reason. You should try out Blender to understand the depths of the tools and see the kind of results one can achieve. There are plenty of online art galleries of work done in Blender, if you are looking for motivation. A quick search on Artstation.com for Blender will throw up some results.
 Blender while around for a while, it was not taken very seriously because of its constantly evolving feature-set and somewhat complex interface. Users of other commercial software often found it difficult to get used to. Some major changes have taken place over the past few months and years though. The result is a polished interface, that is simple to use, and friendly towards users of other software migrating to Blender. You can select the graphical and shortcuts you prefer so Blender can tweak its defaults to that software. There are also customizations available in the form of keyboard shortcuts and menu layouts, even colour schemes that you can check out by clicking Edit > Preferences. Many users also share their layouts and themes online for you to try.
 When you first start using Blender, remember that a lot of the workflows you use will depend heavily on keyboard shortcuts. This saves you time and energy needed to move the mouse through depths of menus. The same task can be achieved in a second, using a single keyboard shortcut. Have the patience to learn these shortcuts for most basic operations, then advance through them for other functions. Use online video tutorials to learn and understand the flow of the software, as well as the shortcuts. There are also cheatsheets that can help you train and remember shortcuts better. They are often neatly organized tables for different kinds of functions.
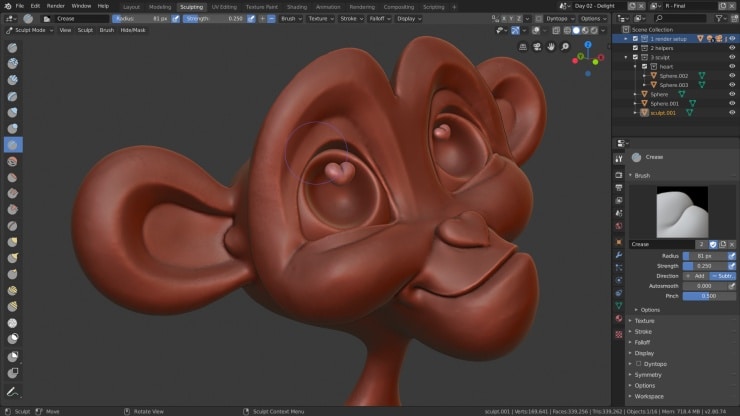
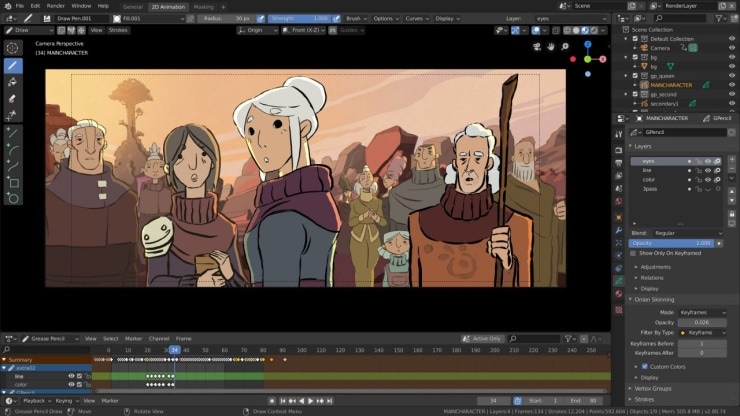
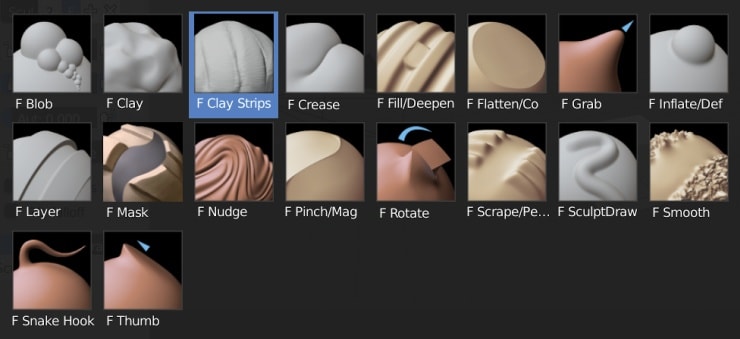
The next thing to understand is that there are stages of taking a concept to a final, product like the ones we see in computer-graphics generated movies and TV shows. These stages are present as tabs in the Blender interface. Each tab has the tools needed to complete that specific task. The Layout tab for example, lets you create, then place objects and move them around the workspace, like you would on a table or an empty room. Most of these objects are called primitives, as they are simple, basic objects. They can be modified into the shape you are trying to achieve, must like a sculptor sculpts a piece of clay. The editing we’re talking of can be done using the tools in the Modeling and Sculpting tabs. Models are made of vertices, with lines and planes interconnecting them. The Modeling mode gives you better tools to move and create forms to your 3d mesh. You could spend days and weeks just mastering the modeling tools. The Sculpting tool offer more organic methods to create free-flowing objects like cloth, faces, bags, etc. Inorganic objects and products are better designed using the Modeling toolbar.
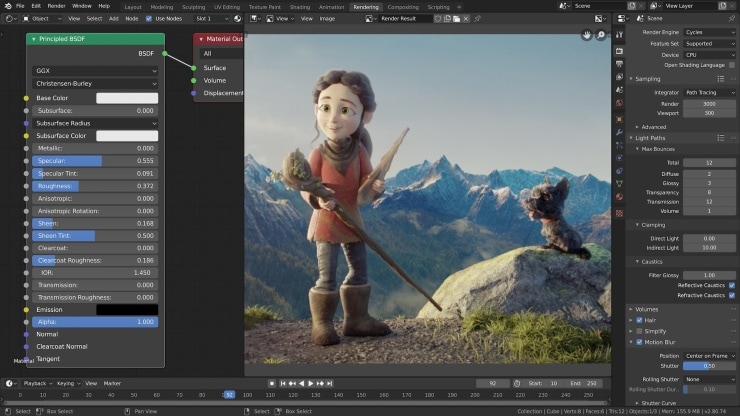
The UV Editing tools let you unwrap a model to paint colours and textures on them. Think of a cube as an example. You could unwrap it into six faces, interconnected with seams. You can then assign images to each side or have a large texture setup to fix the whole cube. The Shading tool lets you give it a realistic look. Every object in the real world has a characteristic. It’s either bumpy, or textured, or has a glossy finish, maybe transparent or translucent or even refractive. All these characteristics can be setup for objects in your 3d scene, and that’s the purpose of the Shading menu. Mastering this is the difference between results that look decent, and those that look realistic.
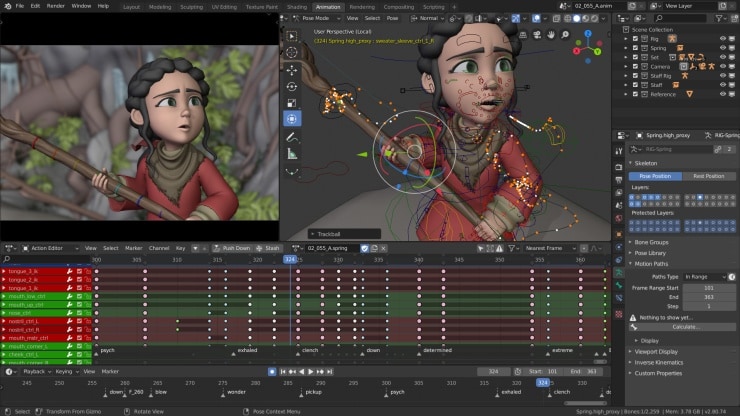 The Animation mode lets you animate the objects you created. Not all the 3d models we create might be static. We may want to animate them and this mode offers all the tools for it. You can set the length of the animation and the intermediate steps where you can change the motion or shape, even colours of the object. The Rendering and Compositing tools are the final stages of the 3d creation process. The Rendering tool creates the final images, frames, and videos that you can play on a movie player. Composition is a mode that’s useful if you want to place your complete 3d model into an existing photo or video. Imagine, being able to create a 3d model of an object you don’t have, but place into a photo or a video with realistic textures and lighting. This is where the composition mode helps.
![]() Blender also supports scripting that can help automate parts of the mundane tasks. It even works like a video editor, and you can use it to stitch videos together and compress them, after adding a bunch of effects to them. It’s a multi-functional software that goes beyond just 3d modeling.
Blender also supports scripting that can help automate parts of the mundane tasks. It even works like a video editor, and you can use it to stitch videos together and compress them, after adding a bunch of effects to them. It’s a multi-functional software that goes beyond just 3d modeling.
Blender has other benefits. It has a large community of users who can guide you with your work. There are also those who develop plugins and scripts to simplify your work. There are plenty of tutorials on YouTube, to get you from the basics to the most advanced stages. Most online CG artwork web sites have sections dedicated to Blender.
 Blender like any other 3D modeling software needs a decent system to operate. It’s lighter than most other software on simpler projects but rendering highly detailed scenes with complex lighting needs more performance. We recommend using a laptop that uses multiple cores, something on the lines of an Intel Core i5, AMD Ryzen 5 and higher, depending on the kind of workload. Using a laptop with a dedicated graphics solution also helps when working on denser mesh, and some graphics card can also render better shadows and lighting, and shaders in real time. This helps in giving you a realistic idea of your work before you need to render it at high, production quality. You can find a variety of gaming laptops and professional laptops that are well-suited for running Blender at reliancedigital.in. Be sure to check them out or you can even head over to your nearest Reliance Digital store.
Kickstart your 3D modeling career with Blender


