Android 9 Pie update has already rolled out for smartphones, introducing a number of exciting features. Perhaps the biggest update is the new notification system. Notifications are an overview of updates and alerts sent to your phone. Among the bunch of notifications, you also see a pointless alerts and promotional notifications which can be quite annoying. Previously, you had no other option than to ignore them. With the latest Android 9 Pie update, you can manage and control these notifications. This guide tells you how you can take advantage of it.
Android 9 Pie visual tweaks
The latest Android 9 Pie update brings change to the UI. It has become rounder, brighter and more colourful. All the notifications are smartly categorized, featuring a card-like design. For quick access to the main notification settings, there is also a Manage Notification option towards the right-end of the notification panel.
Limit notifications with Do Not Disturb
Managing notifications in Android 9 Pie is a lot easier.Note, that the settings may vary depending on your phone brand and model, as long as it runs Android Pie. To get started, go to Phone Settings > Notifications (On some phones you may need to look for Notifications and Shortcuts, Apps & Notifications or Sound & Vibrations)

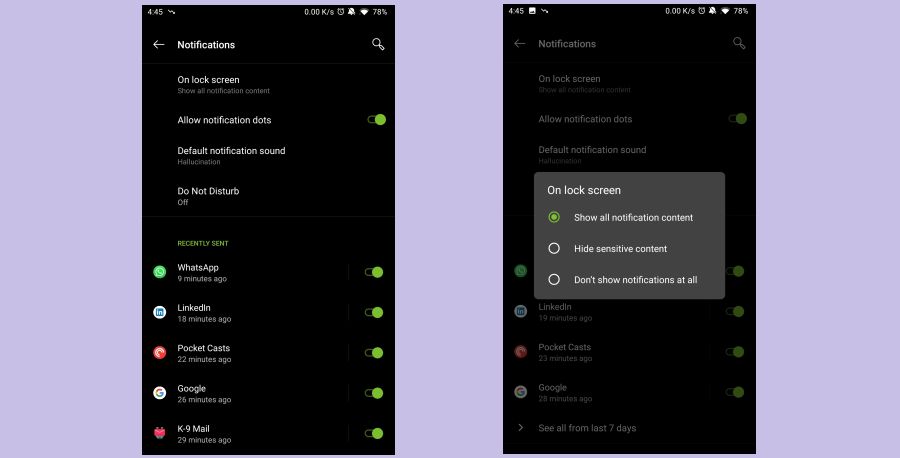
On diving inside the settings, the ‘On lock screen option’ should show three menus – ‘Show all notification content on the lock screen’, ‘Hide sensitive content’ or ‘Don’t show notifications at all’. You can even customize them further by assigning a default sound and also allowing notification dots to appear on the screen. Another important part in the notification system is the Do Not Disturb setting. To access it, swipe down the phone’s screen to access Quick settings > Tap on the DND shortcut button to activate.

Within the Do Not Disturb setting, you can manage the Behaviour and Exceptions of the notifications and also schedule them. Under the Behaviour setting, you can select if you want your phone to beep for notifications, while the Exceptions section lets you make changes to a mix of settings for calls, messages, events and reminders, alarms and media. If you wish to schedule the notifications, set how long you want the Do Not Disturb to be enabled, by adding an event (say meeting, work) or by specifying a time.
Just below the initial settings, you should see a dashboard of apps that tells you how frequent you receive notifications. You can expand it further to get details of every app installed on your phone. If the number of notifications you receive per day is very high for a certain app, you can choose to disable notifications for it by just sliding the toggle button or by toggling the kind of notifications.
Reacting to notifications
Notifications also brings in smart ways to react to them. Every separate tile of notifications can be expanded to view the content inside it, by swiping it downwards. You can also choose to archive or reply to messages right away, without having to switch between apps.
The latest Android 9 update has a set of emergency broadcasts that can be used for very urgent notifications, ideal for calls from close family and friends. If you wish to enable them, go to Phone Settings > Apps and Notifications > Advanced settings > Emergency Alerts. Here you will find different alert actions and preferences to toggle.
Select ways to get notified
Last but not least, there are a set of options available to customize ways in which you want to get notified. To set them as defaults, go to Phone Settings > Apps and Notifications > Additional Settings > Notification Light. Pick from options listed below – On lock screen, Floating, Blink light, Allow notification dots, Swipe fingerprint for notification, Screen wake, etc. Remember that these notifications may differ from one phone to another.
These were some of the different ways you can control and manage notifications on your phone running Android 9 Pie. If you haven’t, now is a good time to reduce the distractions and clutter. Hopefully, you will find these tips useful and will also help manage your time better spend on phones.


